TUTORIAL PHOTOSHOP : MEMBUAT BAYANGAN REFLEKSI AIR
Kamis, 11 April 2013
2
komentar
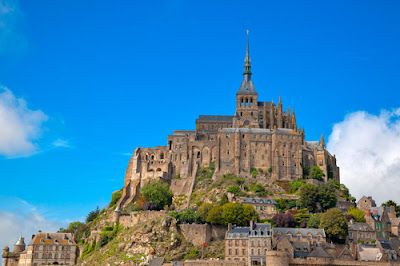
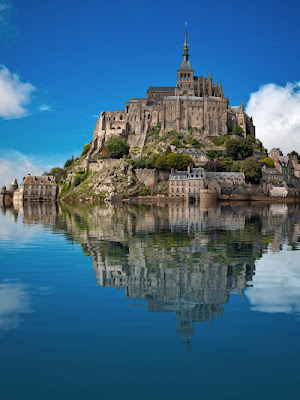
Oke sobat kita lanjutkan tutorial membuat bayangan refleksi air di photoshop, berikut sreenshootnya :
 |
| Sebelum |
 |
| Sesudah |
Step 1: Making the water reflection
For this photoshop tutorial I’ve used a beautiful photo of Mont Saint Michel in France, as seen from the first image above. You can download the stock photo here: http://freestock.ca/france_g86-mont_saintmichel__hdr_p2172.htmlWith the photo open in Photoshop, first of all you need to expand the canvas so that you can fit the water. Go to Image>Canvas Size, and double the height of the canvas, extending it downwards.
Next duplicate your photo’s layer and call the duplicate ‘reflection’. Flip it vertically, and place it below the photo layer, so it becomes a mirror image of the original photo.
Now add a new layer below the reflection layer and call it ‘water’. Fill the bottom half of the layer with blue – the colour of your water.
Link the ‘water’ and ‘reflection’ layers together, and give the ‘reflection’ layer a layer mask.
With the layer mask selected, draw a gradient down from the horizon, fading in the colour of the water.
Now right click on the ‘reflection’ thumbnail to select the visible pixels of the layer mask gradient.
Go to Filter>Blur>Motion Blur, and set the Angle to 90 degrees, and the Distance to 10 pixels.
We’re finished with the reflection for now. Next we need to create a Displace map that will be used to simulate ripples in the water.
Step 2: Make water ripples in photoshop
Open a new 1000 x 2000 px RGB Photoshop document.
Go to Filter>Noise>Add Noise, and set the Amount to maximum.
Next go to Filter>Blur>Gaussian Blur, and set the Radius to 2 pixels.
Now go to your layers panel and switch to Channels. Click on the Red layer then go to Filter>Stylise>Emboss, and set the Angle to 180 with the Height at 1 and the Amount at maximum.
Do the same again with the Green layer selected, and the Angle set to 90.
Now, back in the layers panel, right click on the background layer and choose Layer from background.
Next we want to stretch the lower part of the image outwards in order to give it the correct perspective.
Go to Edit>Transform>Perspective and pull the bottom corners outwards as far as you can.
When you’ve got it looking like mine, Go to Image>Image Size, and bring the height down to 1000 pixels, making the image square.
You should be left with something not too far off from the image shown below.
Save this as a .psd with maximum compatibility and close it.
Step 3: Applying the Waves Ripples
Back in your original project file, click on the reflection layer thumbnail and make a selection over the lower half of the image, where you want the wave effect to be applied.
Go to Filter>Stylize>Displace, and set the Horizontal Scale to 30, and the vertical scale to 60. Also select Stretch to Fit and Repeat Edge Pixels.
Once you’ve clicked OK the effect will be applied, and should look like the image below. You may have to go back and adjust Scale of the Displace filter if needed.
Step 4: Final touches to create realistic water reflections
To finish off, we’ll make some small adjustments to the image as a whole. First we’ll darken the area where the water meets the land.Add a new layer, and make a narrow selection along the horizon. Go to Edit>Fill and choose to fill with black.
Deselect it, then Gaussian blur the black strip at 20 pixels.
Change the layer’s blending mode to Soft Light, and take it’s Opacity down to 80%.
Add a Hue/Saturation adjustment layer, and take the Saturation down to -30.
Add a Black and White adjustment layer using the Green filter preset. Set the layer’s blending mode to Overlay, and it’s Opacity to 30%.
And finally, add a Gradient adjustment layer using a transparent to black gradient set to Radial, with the Scale at 150%. Set the blending mode to Soft Light and the Opacity to 30%.
The Final Outcome
Hope you enjoy this beginner’s photoshop tutorial on how to create realistic water reflections. For similar articles, you might want to check how to blur background in photoshop and how to change hair color in photoshop.
Matt is a freelance graphic designer from the UK. Visit his blog at Blog.DesignNocturne.com for more tutorials.
TERIMA KASIH ATAS KUNJUNGAN SAUDARA
Judul: TUTORIAL PHOTOSHOP : MEMBUAT BAYANGAN REFLEKSI AIR
Ditulis oleh Unknown
Rating Blog 5 dari 5
Semoga artikel ini bermanfaat bagi saudara. Jika ingin mengutip, baik itu sebagian atau keseluruhan dari isi artikel ini harap menyertakan link dofollow ke https://rosorasa.blogspot.com/2013/04/tutorial-photoshop-membuat-bayangan_11.html. Terima kasih sudah singgah membaca artikel ini.Ditulis oleh Unknown
Rating Blog 5 dari 5


2 komentar:
SANGAT BERMANFAAT GAN
waduh ko bhs inggris mas..
Posting Komentar